How to Scan on iPhone: A Complete Guide for Beginners and Pros


In today’s digital-first world, scanning documents, receipts, or handwritten notes directly from your mobile device is not only convenient but often essential. If you’re an iPhone user, you might be surprised to know that your device already comes with built-in scanning capabilities — no need for a third-party app.
Apple’s iOS makes scanning documents easy, fast, and accurate. Whether you’re a student, a business professional, or just someone who wants to keep digital records, learning how to scan on an iPhone can simplify your life. In this comprehensive guide, we’ll walk you through the steps to scan documents on the iPhone, share advanced tips, and answer common questions.
Gone are the days of bulky scanners and printers. With your iPhone in hand, you can:
Scan important documents like IDs, contracts, or tax forms
Save and share digital versions as PDFs
Quickly capture whiteboards, notes, and receipts
Reduce paper clutter
Increase productivity and document management
The best part? You don’t need to install any additional software. The built-in Notes and Files apps in iOS already have this functionality.
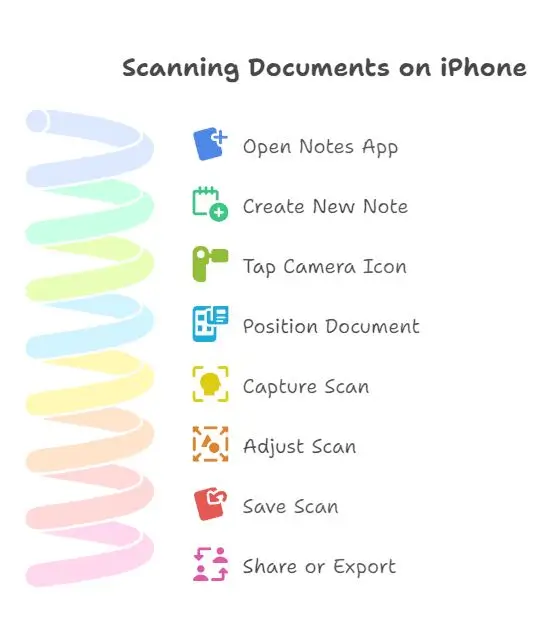
The Notes app is the simplest and most powerful tool for scanning documents on an iPhone.
Go to your home screen or use Spotlight Search to open the Notes app.
Tap the “Create” icon (a square with a pencil) at the bottom right to start a new note.
Above your keyboard (or in the toolbar), you’ll see a camera icon. Tap it and choose “Scan Documents.”
Hold your iPhone steady over the document you want to scan. Your iPhone will automatically detect the edges and capture the scan. You can also manually press the shutter button.
After capturing, you can:
Drag the corners to crop
Rotate or adjust brightness
Choose color options like grayscale or black & white
Tap “Keep Scan” if you're satisfied, and repeat for more pages if needed. Tap “Save” when done. Your scan is now stored in the note.
Tap the share icon to:
Email it
Save it to Files
Convert to PDF
Send via messaging apps
For users who manage files through iCloud Drive or local storage, the Files app offers another way to scan directly into a folder.
Open the Files app
Navigate to the folder where you want to save the scan
Tap the three-dot icon (•••) at the top-right
Choose “Scan Documents”
Position and scan your document
Tap Save, and the scan is saved as a PDF in the selected folder
This method is perfect if you’re organizing receipts, contracts, or forms into folders for work or school.
Apart from documents, your iPhone can also scan QR codes, which are used for links, menus, payment apps, and more.
Open the Camera app
Point it at a QR code (no need to take a photo)
Wait for the yellow notification banner
Tap the banner to open the link or app
Bonus: You can also scan QR codes from images in your gallery using apps like Safari or Shortcuts.
To get the most out of your iPhone’s scanning features, try these expert tips:
1. Use Good Lighting
Natural light or a desk lamp can help reduce shadows and improve scan clarity.
2. Keep a Steady Hand
Place your iPhone on a stack of books or use a phone stand for a steady shot, especially when scanning multiple pages.
3. Use Grayscale or Black & White Filters
These filters help reduce file size and make printed text more readable.
4. Name and Organize Scans
After saving, tap the scan title to rename it. Use folders or the Files app to keep everything organized.
5. Turn On Auto-Capture
When scanning multiple pages, enable auto-capture to speed up the process without pressing the shutter each time.
When you scan documents in the Notes app or Files app, they’re automatically saved as image files or PDFs. If you need to convert them to PDF, here’s how:
Method 1: From Notes
Tap the scanned image
Tap the share icon
Choose “Save to Files”
It will be saved as a PDF by default
Method 2: From Files App
Locate your scanned document
Long-press > Share > Save as PDF (or print > pinch to zoom > save as PDF)

While any iPhone running iOS 13 or later can scan documents, newer models offer better camera quality and faster processing.
Recommended:
iPhone 11 and later
iPhone SE (2nd Gen and newer)
iPhone 12, 13, 14, 15 series
Higher resolution cameras mean clearer text, better edge detection, and more accurate scanning.
Although the built-in tools are great, some users prefer specialized apps for added features like OCR (Optical Character Recognition), cloud syncing, or batch scanning.
Adobe Scan
Microsoft Office Lens
CamScanner
Genius Scan
Evernote Scannable
These apps offer features like:
Text recognition
Auto-backup to cloud
Annotating PDFs
Business card scanning
Still, for most users, the default Notes or Files app is more than sufficient.
Q1. Can I scan multiple pages into one document?
Yes! After your first scan, keep scanning additional pages. They’ll be added to the same file.
Q2. Where are my scanned documents saved?
If scanned through Notes, they’re saved in the specific note.
If scanned through Files, they’re saved in your selected folder as PDFs.
Q3. Can I edit a scan after saving it?
Yes. Open the scan, tap Edit, and you can crop, rotate, or adjust filters.
Q4. Can I add a scanned document to an email?
Absolutely. Tap the share icon on your scanned file, then choose Mail to attach it.
Q5. Is scanning on an iPhone secure?
Yes. All scans remain private unless you share them. You can even lock Notes with Face ID for extra privacy.
|
Benefit |
Description |
|
Portability |
Scan documents anywhere without bulky machines |
|
Speed |
Capture and save within seconds |
|
Accuracy |
Auto-edge detection and smart filters enhance scan quality |
|
Organization |
Save, tag, and rename for easy access |
|
Paperless Productivity |
Reduce paper usage and streamline your workflow |
Learning how to scan on an iPhone opens up a world of convenience, whether you're a student submitting assignments, a freelancer handling receipts, or someone going paperless. With built-in scanning tools in the Notes app and Files app, your iPhone becomes a powerful document scanner in your pocket.
No need for third-party software, expensive equipment, or steep learning curves. Just follow the simple steps outlined in this guide, and you’ll be scanning like a pro in no time.
In today’s digital-first world, scanning documents, receipts, or handwritten notes directly fr…
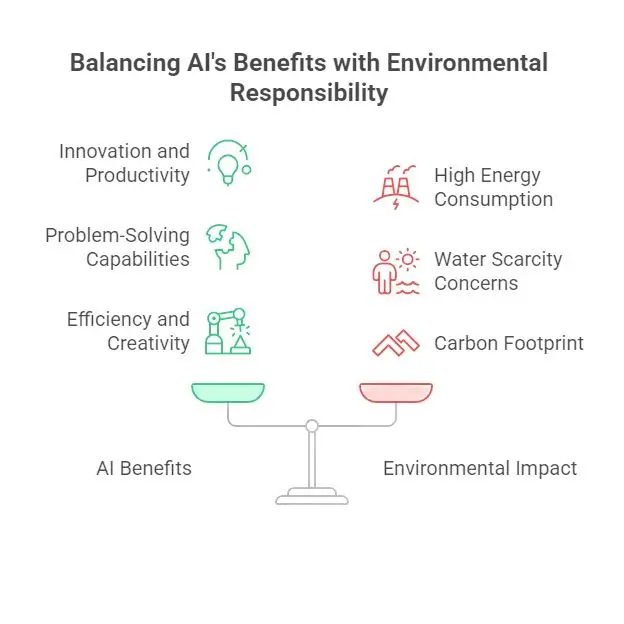
Artificial Intelligence (AI) has revolutionized the world—transforming industries, powering in…
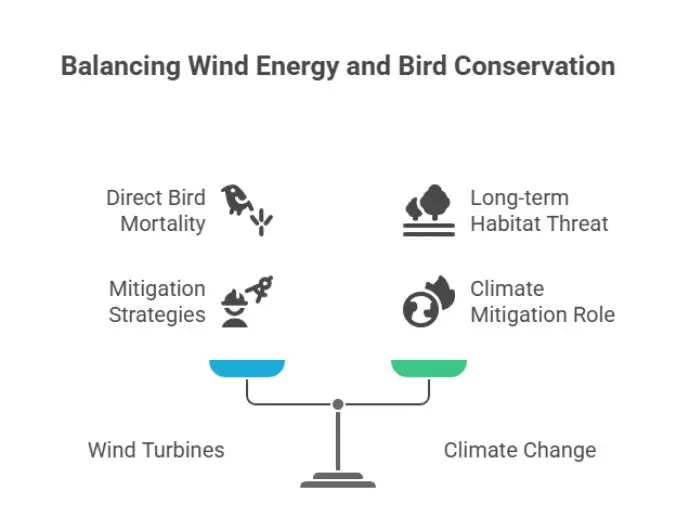
As the world moves toward renewable energy sources, wind power has emerged as a leading solution to …


Comments
No comments yet. Be the first to comment!